Terrain picking solved

Finally, I figured out now to do precise terrain picking, so now I can make a lot of progress! As I’m going to be using BEPU for the physics engine, I just let BEPU do the dirty work. Using it to create a terrain height field and doing ray intersection testing is pretty intuitive. Storing 4 million points is no problem for it, but I may look into its source code to see how it’s doing the intersection tests so efficiently.

In the meantime, though, I can move on to creating the brush and mesh placement tools. Mesh placement should be easy, as I want most objects to be touching the ground. Placing meshes will also be treated as brushes so you can fill the landscape with loads of objects quickly. For now I have this video as a proof of concept for testing.

Some ideas on the placement tools:
– Mesh brushes will likely be done the way of Poisson Disk sampling as demonstrated here, so the spacing of objects looks natural and you don’t have to think much about how their placement looks.
– Objects can still be changed individually if you wish. A single Selection tool will make it possible to change an object’s scaling and location.
– Rotation can be done on a basis of either having all objects orient towards the surface normal, or ignore the Y component. Rocks, for example are fine for rotating in all directions, but trees and buildings should generally point up.
– A toggle switch for each object so you can snap its vertical position to the ground surface in one click.

Physical interactions with the objects will come a bit later. I will at least need a wrapper class to associate mesh instances with BEPU Entities.

The current game plan

Bye bye geo-clipmaps, here comes geo-mipmapping! I’ve been busy at converting my terrain rendering code to use it from now on. It’s not fully completed but the basics work. I just need to fix up the holes that appear in the borders between different detail meshes. The terrain system has advanced a lot more than when I used geo-mipmapping. While it still only supports two textures, the cliff texture can be sampled twice in two different scales to remove any semblance of repetition. No fractals or noise patterns here, it’s all from pre-made texture images. I’m also messing around with a vignette effect, currently made part of the Depth of Field shader. The engine is also now running with a game screen framework built on top of the official XNA sample.

screen28-1

Now to move on to the game structure itself. I’m not too keen into drawing UML diagrams or other fancy charts, also because I have not gotten really comfortable with a diagram editor. I’d rather sketch them on paper and take some photos of it with a phone. But I do have a tree-like structure to organize my code in.

This planning comes easier as I figure out the first thing I want to do with my terrain renderer is to put it in a game state that will later on be the in-game map editor.

The puzzle game I made earlier made a good learning experience in understanding how a screen and menu system can be put together where multiple states and screens run independently of each other. The game may not be 100% done, but its code is stable enough for me to be able to port the screen system into this new game. Because this would be the most complex game I’ve attempted, I look forward to seeing how far I can take it. With a loading screen and transition to game modes are in place, it will at least finally start feeling more like something with a greater purpose than a tech demo.

The graphics engine is still a work in progress so I will work on it together with making the game. The game code will be organized in three different areas: Core, Game, and Screens.

Core

  • Graphics engine (my own)
  • Physics engine (BEPU or maybe Bullet)
  • File saving/loading
  • Input
  • Networking
  • Screen system (from my last game)
  • Menu interactions
  • Screen drawing/updating system

Game

  • Game logic, AI
  • Player interactions
  • Game objects
  • Editor
  • Editing tools and functions

Screens

  • Background(s)
  • Loading screen
  • Menus
  • Gameplay modes
  • HUDs and interfaces

Core contains all the systems that deal with the lower-level workings of the game. Sending data to the graphics engine, setting up and managing physics, input management, and the loading and saving of files all go here.

Game contains all the very game-specific logic that’s all about setting the rules, game modes, and specific interactions with game objects. They all tie into Core in some way, depending on what they are responsible for doing. A more specific area, Editor would include all the tools and functions used for the game’s map editor mode.

Screens can be seen sort of like game states and also like components that, when grouped together, can describe a game state or mode of behavior. They are loaded and ran from the screen system, and either specialize on displaying information related to the game, or tell the user what actions are available. Background screens, gameplay screens, HUDs, inventory screens, and menus would belong here.

As you may have noticed, the three groups tend to progress from low-level to high-level code. This was not really intended, but does give me a better idea of how to pass data around.

The graphics engine is already running in the screen system. When the program launches it add a Screen to a list, which loads the content to be rendered. Here is the game loading a terrain in real-time, with some interactions handled by an “Editor” screen.

(lolwut, YouTube detected this video to be shaky. It’s all rigid camera movments in here)

There are a few issues I have to take care of with the screens and graphics. Both the screen system and graphics engine are loaded as XNA game components, which means they draw and update automatically within the game, outside of the screen system’s control. Although the content loading code is in the Editor screen, I need the option to make the explicit choice of what order the graphics should be drawn, so that any graphics that are set in a particular screen get drawn with that screen’s Draw call.

Triplanar normal mapping for terrain

First, before having gotten into terrain normal mapping, I added mouse picking for objects. I have some interactivity now!

screen26-1

This is taken from an XNA code sample, then I modified it so it supports instanced meshes. So now it’s able to pick the exact instances that the ray intersets, and displays their mesh name. It doesn’t do anything other than that for now, but it’s just the first step towards editing objects in the level editor.

Mapping the terrain

The new update was for fixing a problem that’s been bugging me for a few weeks- combining normal mapping with triplanar texturing. It was a tricky affair as the normal maps get re-oriented along three planes so you also have to shift the normals accordingly. After revising how I did my regular normal mapping for other objects, I was able to get correct triplanar normal mapping for the terrain. This goes for both forward and deferred rendering.

I have only two regular textures- the base texture for mostly flat areas, and a blend texture for cliffs in steep areas. My normal map is for the cliff texture, and no normal mapping is applied for the flat areas. You can also set a bump intensity which increases the roughness of the terrain. Naturally, with great roughness comes great respons- less specular highlights. So you would have to tune the specular and roughness so it achieves a good balance. Most of the time terrain, doesn’t need specular lighting, but it’s needed for wet and icy areas.

Bump up the volume

Terrain normals, binormals, and tangents are all calculated on the CPU, which is the ideal way to go as it saves a lot of overhead of doing it every frame. In the vertex shader, the normal, binormal and tangent are transformed to view space and added to a 3×3 matrix.

output.TangentToWorld[0] = mul(normalize(mul(input.tangent, World)), View);
output.TangentToWorld[1] = mul(normalize(mul(input.binormal, World)), View);
output.TangentToWorld[2] = mul(normalize(mul(input.Normal, World)), View);

In the main pixel shader function we must first compute the normal mapping output before it can be contributed to the vertex normal outputs.

PixelShaderOutput PixelTerrainGBuffer(VT_Output input)
{
    // Sample normal map color. 4 is the texture scale
    float3 normal = TriplanarNormalMapping(input, 4);

    // Output the normal, in [0,1] space
    // Get normal into world space

    float3 normalFromMap = mul(normal, input.TangentToWorld);
    normalFromMap = normalize(normalFromMap);
    output.Normal.rgb = 0.5f * (normalFromMap + 1.0f);

    // ... Then output the other G-Buffer stuff
}

The textures are expected to be in the [0, 1] range and TriplanarNormalMapping outputs them to [-1, 1] so they are properly transformed with the TBN matrix. After that we can set the normals right back to the [0, 1] range for the lighting pass. Remember that it outputs to an unsigned format, so if we don’t do this, all values below zero will be lost.

The following function computes triplanar normal mapping for terrains.

float3 TriplanarNormalMapping(VT_Output input, float scale = 1)
{
    float tighten = 0.3679f;

    float mXY = saturate(abs(input.Normal.z) - tighten);
    float mXZ = saturate(abs(input.Normal.y) - tighten);
    float mYZ = saturate(abs(input.Normal.x) - tighten);

    float total = mXY + mXZ + mYZ;
    mXY /= total;
    mXZ /= total;
    mYZ /= total;

    float3 cXY = tex2D(normalMapSampler, input.NewPosition.xy / scale);
    float3 cXZ = float3(0, 0, 1);
    float3 cYZ = tex2D(normalMapSampler, input.NewPosition.zy / scale);

    // Convert texture lookups to the [-1, 1] range
    cXY = 2.0f * cXY - 1.0f;
    cYZ = 2.0f * cYZ - 1.0f;

    float3 normal = cXY * mXY + cXZ * mXZ + cYZ * mYZ;
    normal.xy *= bumpIntensity;
    return normal;
}

Note that where I define the texture lookups, the XZ plane is just set to a normal pointing directly towards the viewer. The X and Y values are in the [-1, 1] range, and Z is by default 1 because it is not used for view-space coordinates. So don’t forget to flip normalized negative values! Then X and Y are multiplied by the bumpIntensity. The default roughness is 1, and a roughness of 0 will completely ignore the normal map for the final output.

A lot of my texture mapping code was adapted from Memoirs of a Texel. Take caution, that if you want to follow that guide, there is a glaring mistake in that code that I noticed only after seeing this GPU Gems example (see example 1-3). You need to clamp your weight values to between 0 and 1 before averaging them out. The blog article doesn’t do this in its code. Otherwise you will get many dark patches in your textures. I fixed this with the saturate() function shown in the above example. This goes for regular texture mapping as well as normal mapping.

Here are some screenshots with the normal mapping in place. The bump intensity is set to 1.8 for a greater effect.

Edit: I’ve used some better textures for testing now. I got some free texture samples at FilterForge.

screen27-4

screen27-3

screen26-4

screen26-2

Normal computation is the same for forward rendering as it is for deferred rendering. The normals as they contribute to lighting would still be in the [0, 1] range in view space.

Looking back, and more game details

It’s been about a year and a half since I’ve started this blog, and back then my engine project was only 2 months old. This January is the first year my blog received more than 1000 visits in a month, and with February being second month in a row, I hope it continues. My most popular posts used to be the code sample articles (I probably should update those) but now more of my recent posts have been catching on there. I still plan to post some helpful code articles for some variety, but it will be more based on what I’m currently working on.

Also, I have started my own GameDev journal to show my progress to the community, so I hope to continue on there to promote my game. I used to think you only need to be a paid member to create journals, but I guess not anymore. This blog will still be updated more liberally and frequently, while articles in the journal will be posted with a bit more consideration and preparation.

Outside of this blog, I have gotten more involved in the game development scene by going to local meetups, usually organized by the IGDA members, and hearing the war stories of experienced developers (indie and AAA) and learning ways to get your games to a finished, workable state and other ways to make your life easier. Meeting people here has been fun, and although I haven’t collaborated with anyone for a project, it’s not out of the question. I would also like to get into a game jam in person, whenever I can schedule enough time for it.

Racing game details

Hey, you know that racing game that’s supposed to happen? Well, I still plan on making it happen, and my ideas are becoming a bit more solidified now. I always planned on making anything but a super-serious racing sim, because those take too long to get all the details right in the physics and the authenticity of the look and feel. Also I won’t have permission to use real-life cars in the game. Previously, I said I wanted to make an off-road racer, but that might still lead to some high expectations on the landscapes and environment. Also, I would have to limit myself to how the vehicles should handle. So for now, it’s a general arcadey racer that will just happen to have some trucks and ATVs in it.

Now on to some of the main features of the game.

Multiplayer

One of the things I want my racing game to have- MULTIPLAYER. That’s a big one. I want people to race other people, and especially across different computers. So this also means including network play. I have never done a networked game before, so this part would be completely new to me. I don’t know how to set up a waiting area, or find available players online. Should I use client-server or a P2P architecture? So many things to figure out. Lidgren is a popular library for online gaming in XNA, which I will probably use anyways for reasons stated later. Work on this likely won’t start until about halfway through the development process.

Before that, and easier to test, is to have local multiplayer. My graphics engine will make split-screen support a breeze, with the way I can hook up different cameras to the same scene and draw it several times. The multiple controller support should be easy as well.

Customizing tracks

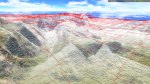
Another big one, is wait for it- track creation. Yeah, it sounds ambitious but I figure if I am gonna aim for making the track creation tools easy for me to program, it might as well be user-friendly and simple enough for players to use. See ModNation Racers and a bit of TrackMania for inspiration, but moreso ModNation Racers because their editor looks more fun and inviting to use. And I don’t mean to brag much, but holy cow, my graphics engine looks about as good as MNR’s… I’m basically halfway there 😉 Their splatting techniques do not use a million textures, and cliff textures automatically appear in steep sides.

“Why are you making a clone?” You may ask. Well, it’s obvious it’s one of my favorite games and it gets me inspired. Other people have made clones other than for learning purposes, like CounterStrike clones or _gulp_ Minecraft clones. (Is it just me or are MineCraft clones the new MMO clones?) However one important point is that MNR is only sold on Sony’s platforms, and I do not plan on making something to directly compete with the other popular customizable racers. Besides, TrackMania and TrackVerse seem to co-exist well on the PC and TrackVerse has put their own spin on the genre with a faster-paced WipEout feel. It would be great if a WipEout like game could come out for XBLA or XBLIG but I digress.

Other platforms

That brings me to another feature I plan later down the road, which is cross-platform support. The ultimate goal would be, aside from Windows, to run it natively on Mac and Linux. This obviously means I cannot use XNA forever, and going to MonoGame for non-Windows builds looks like the most attractive option. For those platforms I will need to rebuild the engine library with the MonoGame references instead of the XNA ones. The sooner I can test out the engine on Linux, the better. Lidgren is also used with MonoGame, which will smooth out porting the networking code when I get to it.

The reason I’m sticking with XNA for Windows is because it uses DirectX, while MonoGame for Windows uses OpenGL, and driver compatibility is more of an issue with OpenGL on Windows. I had Linux Mint installed before, but removed it a few months ago. DarkGenesis’ blog looks to be a good resource for porting MonoGame applications, so I’m bookmarking that for now.

Gradually I will be integrating the screen system code that I wrote for the puzzle game I worked on a few months ago. It includes (almost) everything I need to create menus and screen states for the game. This code is big enough to be in its own library, and it may be easier if I just build it as such.

So these are some of the main features of the game. It’s gonna be a tough road ahead, but I think I can make a lot of progress in a few months. Out of these three, the first one I will begin work on is the track editor. It’s going to be the backbone of the game development process, so it makes sense to begin here first.

How low-level should you go?

Today I was going to talk about my start on the game editor’s UI but something else got my attention. I have long been following some blogs and reviewers on XBox Indie Games, and now that the cat’s out of the bag on XNA’s fate, it’s like a large band broke up- that band being the XNA developers community, and they parted ways on how they will continue to make games in the future.

Many stick to what they know and keep on keeping on with XNA, or are moving to the cross-platform MonoGame. A couple others want to focus more on getting things done quicker and go with something high level. One of the prominent XBLIG developers (creator of the million-selling FortressCraft, among 10 other games) spoke about his future with games and his abandonment of XNA for Unity, though he expressed it much more bluntly. Given his short experience with Unity, I felt he jumped the gun too quickly on what’s the best way to go for indie development. No, I don’t think it’s a bad way to make games, and I am trying it out and hope there’s enough scripting for the avid programmers to do. But this feels more of a “first impressions” view on Unity, and made it sound like it’s the only right way to go for indies. That’s on top of a jaded feeling that Microsoft pulled a fast one on him. I’m worse off, though, I haven’t released one XBLIG game and sadly I don’t even have an Xbox at this point.

He stated that he put a lot of initial work and received a lot of experience with coding in XNA as his games grew more complex. But much is clear about the overall message- some people just want to make some goddamn games. His few last statements were of particular interest to me:

If you want to spend a huge amount of your available dev time re-inventing the wheel, go with XNA. Go with MonoGame. Enjoy scratching your head about calculating tangents for reflections, wondering how cascading shadows work, and if you should implement A* or Dijkstra’s for route-finding. Me, I’ll be busy getting on with writing the game.

The tone of this paragraph seems to say “While I’m making a game, I’m also leaving those engine programmers in the dust”. Oh wait, this kinda does sound familiar.

Every developer has their own interest and affinity towards a topic. Just going from his write-up, he seems to be more interested just about the things that define a game. Its rules of play, its design, etc. I have an affinity (or at least I want to improve) towards graphics programming. Which is why I don’t mind scratching my head over shaders and shadows. As a counter-example, I do not really fancy AI or physics programming. I plan to use BEPU Physics or Bullet XNA (especially since I’m already familiar with them) to make things move and bounce all over the place. And for AI I will just follow code tutorials with just enough custom work to make it feel decent.

That preceding article could probably be a debate starter about high-level versus low-level style of game development. I’ll give him something though- I realized that I could put most game programming blogs into two main categories- blogs that talk about their games mainly to non-programmers, and blogs that contain very down-to-the-metal, get your hands dirty with code and math articles. Those “Luminance-based edge detection techinques” articles tend to not live in the same home as “New level packs today!!” articles. Personally, I would like to get a following that consists of a healthy mix of both game programmers and all those gamers that don’t know anything about programming, and I will need to work more on the latter. There’s still a glimmer of hope of getting something on XBLIG, just to follow through my goals.

Barring that, is there any amount of re-inventing the wheel that should be tolerated? How much time can be spent on low-level algorithms until it becomes a hindrance to your productivity and bore your readers that eagerly wait to play your game?